
(this review was originally published on robots.net)
I think this review marks some kind of record for how extensively we’ve tested a hardware product. Normally, when we receive a piece of hardware here at robots.net, we give a brief evaluation and write a basic review of it. So when Pololu sent a 3pi robot in late 2008, I expected to write and post a quick review. As it has turned out, here it is June of 2009 and the 3pi has been more thoroughly field tested than any other robot we’ve worked with. We’ve had way too much fun with this little robot and by the time you finish reading the review, you’ll probably want to buy one or two for yourself. Read on for all the details as well as loads of photos.

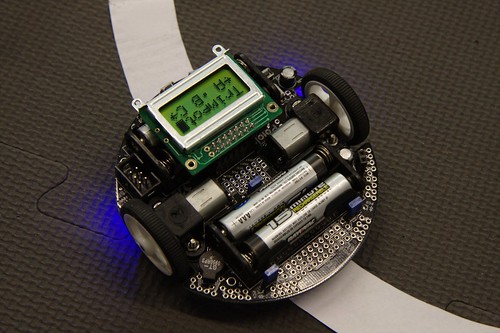
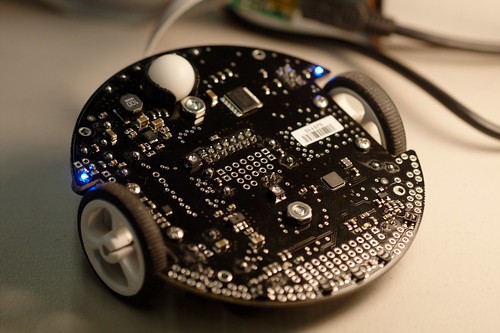
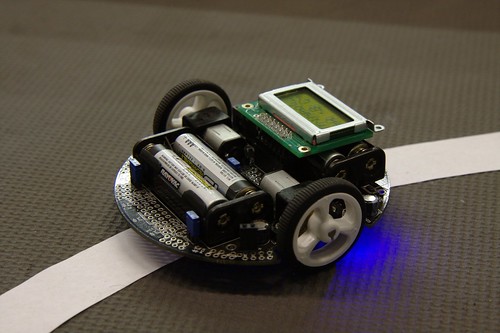
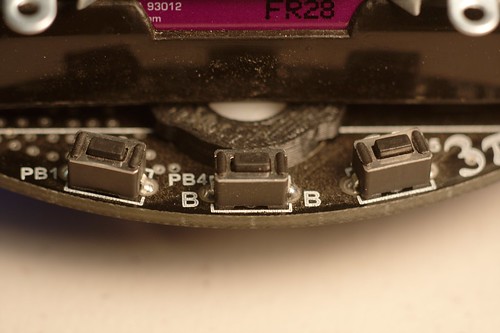
First of all, I should probably describe the Pololu 3pi. The name comes from the size. The diameter in centimeters is the value pi times 3 or 3pi. In inches it’s about 3.7″ in diameter. The 3pi is a self-contained robot with dual motors, five reflectance sensors, an 8×2 character LCD, a buzzer, 4 AAA batteries, and three user pushbuttons. One minor lack is wheel encoders, without which you’ll never get the little robot to go in a straight line. The 3pi is designed primarily as a line-follower, so this isn’t much of a concern. Still I’d love to see a 3pi v2 (or a 4pi?) that added encoders.

Controlling it all is an Atmel ATmega168 (newer models have the ATmega328, which is identical except for having twice the memory). The Free Software and Open Source GNU GCC tool chain provides a mature, powerful compiler that can do just about anything you need. To make things even more interesting, the controller is compatible with the Arduino microcontroller and all of its software.
I knew almost as soon as I got my hands on the 3pi that it was a really nice little piece of hardware. We included it on the robots.net 2008 Top 10 Robot Christmas Gift Ideas list and it kept rising higher on the list throughout the editing process and finally ended up as your number one recommendation for 2008. I anticipated posting a review shortly after that but playing with the 3pi was so much fun I kept finding new excuses to extend the review process.

The first thing I wanted to do was present the robot to some other robot builders and get their thoughts, so I took it a meeting of the Dallas Personal Robotics Group and showed it off. Most people who saw it were impressed and several ordered their own shortly afterward. At last count there were at least 10 3pis rolling around the DPRG world headquarters.

Also in late 2008, the DPRG did a robot demonstration at FenCon, a local literary science fiction convention. I brought along the 3pi as did several other DPRG members. So we had several following each other around a simple hand-drawn, tabletop course as SF fans and guests like Gregory Benford watched in amusement. Later, someone produced a laser printed course made on interchangeable 8.5 x 11 paper. The 3pis are remarkably adaptable to any sort of line; white on black, black on white, narrow, wide, even hand drawn.

By now I’d determined the basic robot was a pretty neat little device, so I decided to investigate the development tools and ease of setting up a development environment. One thing that really annoys me with some microcontrollers and robot kits is that they rely on arcane proprietary tools that only run on a particular OS. I was pleased to discover the 3pi relies on the GNU GCC tool chain. GCC is free software, which means among other things the source code is available and easy to port. So it will install and run on nearly any computer system and OS you can name.

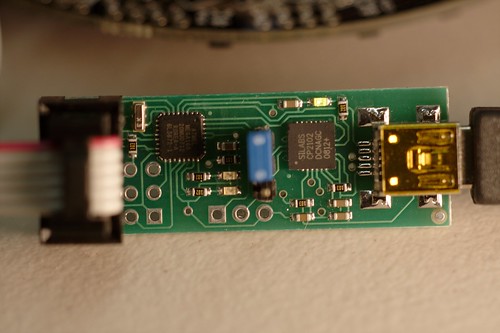
I run Redhat Fedora GNU/Linux on my laptop and desktop. The first step towards a working development environment is making sure the AVR ISP worked. The 3pi came with a Pololu USB AVR ISP. I plugged one end into the 3pi and the other into my laptop’s USB port. Fedora immediately recognized the ISP and started the built-in driver. From what I’ve heard this step may be more complicated for Windows users. Unlike Linux where drivers for nearly everything are built in, Windows often requires the user to search online, download drivers, and install them manually. But on GNU/Linux at least, the Pololu USB AVR programmer works out of the box.
The next step is to get the AVR-GCC tool chain for cross-compiling from GNU/Linux to the AVR ATmega168. This is easier than it sounds. Just type “yum install avr*” and you’re done. This will install the AVR libraries, the GCC cross-compiler and tools, documentation, and the avrdude utility for moving code from your computer to the 3pi. As with the driver, this may be more involved for Windows users but probably no harder than installing any other Windows program.
The final step in setting up the 3pi programming environment is to install the Pololu libraries. These need to be downloaded from the Pololu website and compiled. Here’s how I did it:
- Go to this web page to get a link to the current version of the library:
http://www.pololu.com/docs/0J20/3 - Download the compressed .zip file and unzip to a working directory
- Type “make install PREFIX=/usr/avr”
You should now be ready to test things out by building one of the demo programs and downloading it to the 3pi. Building it should be just a matter of changing to the directory and typing “make”. Downloading it requires using avrdude. If you haven’t done that before, I’ll save you some time: here’s the command I use, which should get you started:
avrdude -p m168 -c avrisp2 -P /dev/ttyUSB0 -U flash:w:test.hex
Most of the demo programs compile to a file called “test.hex” but you may need to adjust that name if you’re working with other source code that is named differently. Also the port I use on my laptop is /dev/ttyUSB0 but your port name may vary depending on what other USB devices are attached and which physical port you’ve chosen to plug the ISP into.

Running avrdude will download the code to the 3pi and you should be ready to go. Overall, I found this process remarkably easy compared to other robots and controllers I’ve worked with which sometimes take days of work to get a cross-compiler working. With the 3pi, I was writing and executing custom code in less than hour.
It was during this process, however, that I found the one major complaint I have with the 3pi. The software library that Pololu provides claims to be licensed under the Creative Commons Share-Alike license version 3.0. Unfortunately, Creative Commons licenses should never be used for software for a variety of reasons including issues related to distinguishing source code from object code. But more importantly, the CC license is incompatible with the GNU GPL license used on most FLOSS software. The intent of the CC-SA license is to take the terms of the GNU GPL software license and apply them to non-software works such as music, art, and photography. Both the Creative Commons FAQ and the Free Software Foundation license guide warn that CC licenses should not be used for software.

So what does this actually mean for the typical user? As long as you’re writing software only for your own use and not sharing it with others or selling it commercially, you should be fine. If you do intend to share or sell the software you write, your best bet is to avoid using the Pololu AVR library altogether, or contact Pololu about getting a compatible license for your application. I’ve spoken with Pololu about this and they are aware of the issue so there’s a chance they may relicense the library under a Free Software license such as the GNU GPL or some other compatible software license such as the BSD license.
License complaints aside, I now had working code and what better way to test it than in a real life robot competition. The Dallas Personal Robotics Group had one of their annual Roborama contests coming up and these always include a line following event. So I started with the sample PID line following software provided by Pololu and made a few minor tweaks. As I began to test the code on the line following course, it hit me just how fast the 3pi is.
The specs say 3 feet per second. Reading that figure doesn’t make the same impression as seeing the tiny robot zipping across the floor. It can easily go so fast that on tight turns, the narrow wheels lose traction, allowing it to fly off the course. With some trial and error I adjusted the robot to have the maximum speed possible given the wheel traction and course material. The final code was so finely tuned that it was necessary to clean the wheels and course prior to each run. A little dust on the wheels was enough to result in a crash.
When contest day arrived, the 3pi not only completed the course successfully but won first prize. Even more interesting, the second and third place robots were also 3pis. I’m fairly sure several spectators at the contest were planning to buy 3pi robots by the end of the day.
So what else could I possibly test at this point? The DPRG, always ready with some new challenge, had been asked to host a “robot petting zoo” at a local science fiction convention called AllCon. The idea was to come up with robots that could survive being handled by a lot of children in a large play area. We ended up getting some white VCT floor tiles and creating portions of line following paths on them. The tiles could then be laid out on the floor and re-arranged like puzzle pieces to make all sorts of different line following courses.

Not surprisingly things quickly got out of control and kids were trying to slide tiles back and forth in real time while several 3pis raced around the lines at top speed. 3pis were flying all over the place, getting kicked and, in one case, stepped on. How did they hold up? All but one survived with no damage at all. The one that was stepped on lost a wheel but was functional otherwise. With a little superglue, the wheel was reattached and it’s as good as new. Obviously, I don’t recommend you treat your 3pi this way but it’s good to know how sturdy they are.
Finally, just before I completed this review, I joined the DPRG for a demo at the A-Kon Anime convention where they were demonstrating a full-size R2-D2 robot built by group member Glenn Pipe. I brought along a 3pi just for fun and demonstrated it for anyone who was interested. It was here that the 3pi received its biggest endorsement yet. When you get a thumbs up from Jesus Christ, you know you’ve got a good product!
